How Angular Renders Components: A Deep Dive Into Ivy
Angular uses a rendering engine called Ivy to transform component templates into DOM nodes. Here, we will look behind the scenes to see how Angular compiles a component, creates its runtime data structures, and ultimately renders it to the browser.
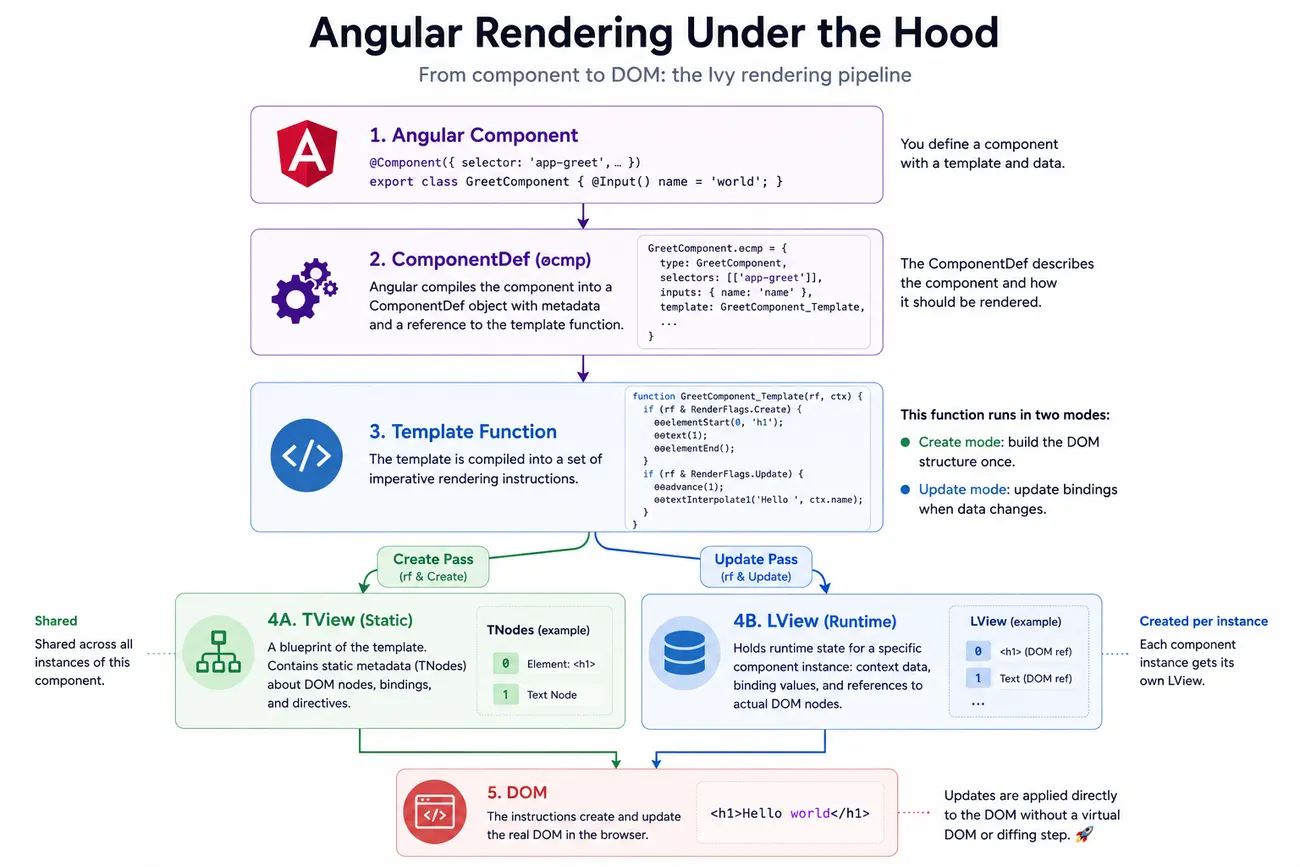
1. The Angular Component
Let’s start with a very simple component:
@Component({
  selector: 'app-greet',
  template: `<h1>Hello {{ name }}</h1>`,
})
export class GreetComponent {
  @Input() name = 'world';
}
This component displays some text inside of an h1 element. The first part of the text is static (“Hello”), and the second part is dynamic — sourced from the component’s “name” Input().
Now let’s see how Angular compiles this component into runtime data structures.
2. The ComponentDef Object
Modern Angular applications are typically built using Ahead-of-Time (AOT) compilation. During the build process, Angular compiles components and templates into JavaScript code that it can execute efficiently at runtime.
When Angular compiles a component, it generates a ComponentDef object (ɵcmp). This object is included in the JavaScript bundle and acts as Angular's runtime description of the component:
GreetComponent.ɵcmp = {
  type: GreetComponent,
  selectors: [['app-greet']],
  inputs: { name: 'name' },
  outputs: {},
  decls: 2,
  vars: 1,
  template: function GreetComponent_Template(rf, ctx) {
    // Rendering instructions! Covered below.
  },
};

GreetComponent.ɵfac = function GreetComponent_Factory(t) {
  return new (t || GreetComponent)();
};
Note: Wondering what’s up with that ɵ character? Angular prefixes many compiler-generated and framework-internal symbols with ɵ (the Latin Small Letter Barred O). These APIs are considered internal implementation details and may change between Angular versions.
The ComponentDef contains all information Angular needs to render the component, including the component’s selectors, dependencies, styles, inputs, and outputs, and much more. You can see our component’s “name” Input() in the inputs field.
The most important field on the ComponentDef for our discussion of the Angular rendering process is the template field. This field contains the template function, which will be our main focus in this article.
3. The Template Function
Angular does not build and diff a virtual DOM tree like React. Instead, it compiles templates into a sequence of imperative rendering instructions.
For our simple component, Angular generates a template function that looks roughly like this:
function GreetComponent_Template(rf, ctx) {
  // Create pass
  if (rf & RenderFlags.Create) {
    ɵɵelementStart(0, 'h1');
    ɵɵtext(1);
    ɵɵelementEnd();
  }

  // Update pass
  if (rf & RenderFlags.Update) {
    ɵɵadvance(1);
    ɵɵtextInterpolate1('Hello ', ctx.name);
  }
}
The function accepts two arguments: render flags and context.
The render flags are bitwise values that tell Angular whether the component is in Create mode and/or Update mode:
export const enum RenderFlags {
  Create = 0b01,
  Update = 0b10,
}
When the component is rendered for the first time, the Create bit will be set, and Angular will execute instructions such as ɵɵelementStart() and ɵɵelementEnd() that create the component's actual DOM nodes and related metadata.
When the component is updated, the Update bit will be set, and Angular will execute instructions that update template bindings.
This differs from a traditional virtual DOM approach. In a virtual DOM system, the framework creates an in-memory tree representing the desired UI, compares that tree against a previous version, computes the differences, and then applies the necessary DOM updates.
Angular skips that intermediate diffing step. Because the compiler already knows the structure of the template, it can generate instructions that directly create and update the correct DOM nodes.
Note: This does not mean Angular performs no change detection or comparisons. Angular still compares individual binding values against their previously stored values to determine whether a DOM update is necessary, but it avoids constructing and diffing an entire virtual DOM tree.
The second argument to the render function, ctx, is the component instance itself. The render function evaluates template expressions against the component instance, allowing bindings such as {{ name }} to read component properties. It also uses the component instance to invoke methods referenced by event bindings, such as (click)="save()".
Now let’s dive one step deeper into how the rendering process works.
4. The First Render
The first time a component instance is created, Angular runs the template function in Create mode:
if (rf & RenderFlags.Create) {
  ɵɵelementStart(0, 'h1');
  ɵɵtext(1);
  ɵɵelementEnd();
}
These instructions create the component’s DOM structure:
h1
└── TextNode("")
As Angular executes the above code, it simultaneously:
- Creates metadata describing the template.
- Creates the actual DOM nodes.
- Stores references to those DOM nodes.
- Builds the runtime data structures used to manage the component.
For example, when Angular executes:
ɵɵelementStart(0, 'h1');
it creates an actual <h1> DOM element and also creates metadata describing that element.
Likewise, when Angular executes:
ɵɵtext(1);
it creates a text node and records metadata describing that text node.
The metadata Angular creates during this step is stored in a structure called a TView, while the runtime state for a particular component instance is stored in an LView.
We’ll look at those structures next.
5. The TView
The TView is the static description of a component's template, shared by all instances of that component throughout the app. Angular creates a component’s TView lazily the first time the component instance is constructed and then reuses it for all future instances of that component type.
You can think of the TView as a blueprint that tells Angular what kind of DOM nodes the component creates, what bindings its template has, and which directives it uses — all the information that is the same for every instance of the component.
The TView uses lightweight objects called TNodes to store metadata about the nodes that appear in the template. Like the TView itself, TNodes are created once and then shared across all instances of a component.
For our GreetComponent, a simplified TView might look like this:
const greetTView = {
  // Reference to the template function
  template: GreetComponent_Template,

  // Prototype used when creating new LViews - more on this below
  blueprint: [...],

  // Static metadata for template nodes
  data: [
    h1TNode,
    textTNode,

    // additional metadata entries omitted
  ],
};
Where the TNodes might look like:
const h1TNode = {
  type: Element,
  tagName: 'h1',
};
const textTNode = {
  type: Text,
};
You can see in the data array that the <h1> node and the text node are both listed.
Notice that the TView does not contain actual DOM nodes or binding values. Instead, it contains metadata (TNodes) describing what should exist.
The data array above also omits the “header” slots. These contain bookkeeping information needed by the framework for rendering, such as references to parent views, directives, and other runtime metadata. We will explore some of these in the next section.
A TView is created only once for each component type. For example, if your application renders 100 instances of GreetComponent, Angular will create only one TView.
Note: I have intentionally kept this example simple so we can focus on the mechanisms of the rendering system. In reality, components can contain a large number of features that need to be represented in the TView and the other data structures we discuss here. For example, Angular must track directives and pipes referenced in templates, component inputs and outputs, dependency injection information, event listeners, template references, content queries, host bindings, and structural constructs such as @if, @for, and <ng-template> views.
6. The LView
While the TView is shared, each component instance gets its own LView.
An LView is simply an array containing the live runtime state for a specific component instance.
To make component creation efficient, Angular stores a pre-initialized LView blueprint on the TView. This blueprint is a partially populated LView array containing values that are the same for every instance of the component. When Angular creates a new component instance, it clones this blueprint and then fills in the instance-specific runtime values, such as the component instance, DOM node references, and binding values. This is faster than constructing an entirely new LView array from scratch for every component instance.
A simplified LView might look like this:
[
  /* 0 */ hostElement,
  /* 1 */ greetTView,
  /* 2 */ flags,
  /* 3 */ parentLView,
  // ...
  /* 8 */ greetComponentInstance,
  // ...
  /* 27 */ h1Element,
  /* 28 */ textNode,
  /* 29 */ 'world'
]
The entries in the LView array correspond directly to the slots described by the TView.
This parallel structure between TView and LView is what allows Angular to represent the LView as a simple array. For example, if slot 27 in the TView describes an <h1>element, Angular knows that slot 27 in every corresponding LView will contain the actual <h1> DOM node. Likewise, if slot 29 in the TView is associated with a template binding, slot 29 in the LView will contain the current value of that binding. The TView provides the meaning of each index, while the LView stores the runtime value for that index.
As with the TView data array, the first entries in the LView are headers. These contain metadata that Angular needs in order to render the component, such as the component’s host HTML element, a reference to the TView, and various view state flags used by Angular's rendering and change detection systems.
One of the values stored in the LView is the component instance itself. As we touched on earlier in the article, Angular uses this reference whenever it executes the template function, passing the component instance as the ctx argument. This is why template expressions such as ctx.name can read component properties and why event bindings can invoke component methods.
Note: In Angular 22, the header occupies the first 27 slots, which is why our component’s first DOM node lands at index 27.
After the headers, Angular stores runtime values associated with the component.
For our simple component, we only have two DOM nodes: an <h1> element and a text node. Here in the LView, these values are no longer TNodes; they are actual DOM nodes.
/* 27 */ HTMLHeadingElement
/* 28 */ TextNode
Angular also stores binding values. The binding values stored in the LView are the previously calculated values, used for comparison when executing change detection.
/* 29 */ "world"
The TView acts as a schema for the view, describing what each slot represents. Because that structural information is stored once in the shared TView, each LView only needs to store the runtime values for a specific component instance. Angular can then access those values by index, which is both memory-efficient and extremely fast.
7. Updating the DOM
During the initial render, Angular first invokes the template function with the Create flag set. This creates the DOM nodes and first-pass template metadata.
Immediately afterward, Angular invokes the template function again with the Update flag set, which evaluates bindings and writes their values into the newly created DOM nodes:
if (rf & RenderFlags.Update) {
  ɵɵadvance(1);
  ɵɵtextInterpolate1('Hello ', ctx.name);
}
The update instructions read values from the component instance and write them into the existing DOM nodes.
Angular compares the newly computed binding value against the previous value stored in the LView. If the value has changed, Angular updates the DOM node and stores the new value in the binding slot. If the value is unchanged, Angular skips the DOM write entirely.
For our example, Angular reads:
ctx.name
and updates the existing text node:
<h1>Hello world</h1>
Angular also caches the binding value in the LView:
[
  ...
  /* 27 */ HTMLHeadingElement,
  /* 28 */ TextNode("Hello world"),
  /* 29 */ "world"
]
On subsequent executions of the template function, Angular reuses the existing TView, LView, and DOM nodes.
If the binding value changes:
ctx.name = 'Shane';
Angular updates the text node:
<h1>Hello Shane</h1>
If the value has not changed, Angular skips the DOM write entirely.
8. Embedded Views
I have kept our example component template fairly simple up to this point so we could focus on the basic Angular compilation and rendering processes. Now that we have covered those processes end-to-end, let’s see what happens when we add another core Angular feature — embedded views.
Real applications often need to conditionally create and destroy parts of the DOM. For example:
@Component({
  selector: 'app-greet',
  template: `
    <h1>Hello {{ name }}</h1>

    @if (isAdmin) {
      <p>Administrator Mode</p>
    }
  `,
})
export class GreetComponent {
  name = 'world';
  isAdmin = true;
}
At first glance, Angular could simply generate instructions for the <p> element alongside the <h1>.
However, that would not work because the <p> only exists when isAdmin is true.
Instead, Angular compiles the contents of the @if block into a separate template function:
function IfBlock_Template(rf, ctx) {
  if (rf & RenderFlags.Create) {
    ɵɵelementStart(0, 'p');
    ɵɵtext(1, 'Administrator Mode');
    ɵɵelementEnd();
  }
}
The GreetComponent template now references the IfBlock_Template function in its own render function:
function GreetComponent_Template(rf, ctx) {
  if (rf & RenderFlags.Create) {
    ɵɵelementStart(0, 'h1');
    ɵɵtext(1);
    ɵɵelementEnd();

    ɵɵtemplate(2, IfBlock_Template); // Create "If" block template
  }

  if (rf & RenderFlags.Update) {
    ɵɵadvance(1);
    ɵɵtextInterpolate1('Hello ', ctx.name);

    ɵɵadvance(1);
    ɵɵconditional(ctx.isAdmin); // Conditionally render the "If" block template
  }
}
The @if block in the GreetComponent template becomes a separate embedded view with its own template function. The ɵɵconditional() instruction in the Update block evaluates the isAdmin expression and determines whether that embedded view should exist.
Angular represents the location where the embedded view may be rendered using a structure called an LContainer. Conceptually, an LContainer acts as a placeholder within the parent view that can hold zero or more embedded views. In our example, the GreetComponent LView contains the <h1> element, the text node, and an LContainer associated with the @if block.
When isAdmin becomes true, Angular creates an embedded LView for the IfBlock_Template, executes its template function, creates DOM nodes, and inserts the resulting DOM nodes into the LContainer. When isAdmin becomes false, Angular destroys that embedded LView and removes its DOM nodes.
Whenever Angular needs to dynamically create, destroy, repeat, or defer a portion of a template, it does so by creating embedded views and managing them through an LContainer. We've used @if as our example here, but the same underlying mechanism is also used by constructs such as @for, @switch, @defer, and <ng-template>.
9. Rendering a Full Application
So far we have focused on a single component. Real Angular applications consist of many nested components.
Consider another expanded version of our initial example:
@Component({
  selector: 'app-greet',
  template: `
    <h1>Hello world</h1>
    <app-status></app-status>
  `,
})
export class GreetComponent {}
Here I’ve added a child component, StatusComponent, to the GreetComponent template. We’ll keep StatusComponent extremely simple:
@Component({
  selector: 'app-status',
  template: `<p>Online</p>`,
})
export class StatusComponent {}
When Angular compiles the updated GreetComponent template, it generates instructions that are conceptually similar to:
function GreetComponent_Template(rf, ctx) {
  if (rf & RenderFlags.Create) {
    ɵɵelementStart(0, 'h1');
    ɵɵtext(1, 'Hello world');
    ɵɵelementEnd();

    ɵɵelement(2, 'app-status'); // Host element for child component!
  }
}
During the create pass, Angular creates the <h1> element and then encounters the <app-status> element.
Unlike a normal DOM element, Angular recognizes that <app-status> is the host element of another Angular component. At that point Angular:
- Creates a new StatusComponent instance.
- Creates a TView for the StatusComponent (if one does not already exist).
- Creates an LView for the StatusComponent instance.
- Executes the StatusComponent template function.
As Angular encounters child components, this process repeats recursively. Each component receives its own TView and its own LView, producing a tree of views that mirrors the application’s component hierarchy:
GreetComponent LView
│
└── StatusComponent LView
A larger application might produce a hierarchy like this:
AppComponent LView
│
├── HeaderComponent LView
│
└── DashboardComponent LView
    │
    ├── ChartComponent LView
    │
    └── TableComponent LView
Thus, Angular’s rendering and change detection systems recursively traverse the hierarchy of views, visiting parent and child views in a depth-first manner. The result is a complete DOM tree built from a hierarchy of component views.
Conclusion
Angular rendering revolves around template functions generated by the compiler. Rather than building and diffing a virtual DOM tree, Angular compiles templates into imperative instructions that directly create and update DOM nodes.
Angular represents runtime state as a tree of LViews, which are themselves simple arrays holding all values needed to render the component: DOM node references, binding values, the component instance, view state flags, and other framework-managed runtime metadata.
The reason Angular can represent views as compact arrays is that each LView is paired with a shared TView. The TView acts as a schema for the view, describing what each slot in the LView represents. Because that structural information is created once and reused across all component instances, Angular avoids storing duplicate metadata and can access runtime values through fast index-based lookups.
When component state changes, Angular re-executes the template function in Update mode. Rather than rebuilding the DOM, Angular reuses the existing TView, LView, and DOM nodes, updating only the bindings whose values have changed.
This design allows Angular to efficiently render and update applications without maintaining a separate virtual DOM representation.
How Angular decides when a template function should be re-executed is the responsibility of Angular’s change detection system — which is a topic for a future article!
In the next article, we’ll look at how React renders components and compare its virtual DOM approach to Angular’s instruction-based rendering model.
Originally published on Medium.